Removing the Pentaprism Foam from an Olympus OM-1/OM-2


Introduction

The majority of Olympus OM-1's and OM-2's have a piece of foam installed in the space between the pentaprism and the flash shoe support bracket1. Over time this foam begins to deteriorate and turn into a very sticky glue-like substance. This substance eventually attacks the finish on the pentaprism resulting in distracting spots in the viewfinder. Removal of the foam will prevent this pentaprism damage and keep the viewfinder looking new.

1some production runs used a plastic shield or a piece of tape to cover the opening. On these bodies nothing needs to be done.

Background

Prism Damaged by Foam
Pentaprism damaged by deteriorating foam
Click on photo for a larger image
Along the sides of the eyepiece are located the two photocells used to provide the meter reading. The purpose of the eyepiece foam is to prevent any stray light from entering along the eyepiece and possibly affecting the readings from the photocells. In reality this foam is not necessary since the top cover provides a very tight seal and little, if any, light is present around the eyepiece.
 
The photo on the left demonstrates a particularly bad case of foam deterioration. You can see how it has stuck to the surface of the pentaprism and damaged it. This damage could have been prevent had the foam been removed before it reached this state.
Foam Damaged Prism
Damaged pentaprism
Click on photo for a larger image
With the pentaprism removed from the body we can clearly see the damage produced by the foam. A damaged pentaprism cannot be repaired, it must be replaced. As an alternative to replacing the pentaprism, the damaged area can be removed down to the bare glass and then polished clean. The bare glass will still reflect the image but there will be a small line visible at the transition point from glass to mirrored surface. Although not a perfect solution, it is still better than viewing the damaged coating. The result of removing the damaged area of the pentaprism can be seen here. This pentaprism is still perfectly useable in this condition.


The following procedure assumes the top cover has already been removed from the camera. See the tutorial "Removing the OM-1/OM-2 Top Cover" for detailed instructions on how to remove the top cover.

Step 1: Remove Flash Shoe Bracket

Prism Foam
Foam before removal
Click on photo for a larger image
The pentaprism foam which we will be removing is located directly under the flash shoe support bracket. The bracket is removed by unscrewing the two screws located at its base and then lifting the bracket up. As the bracket is removed the foam may tear and portions may remain on the prism and/or eyepiece. Be careful not to pull and twist the black wire which is attached to the socket, it can easily break from the socket. If it breaks off the socket it can be soldered back on but be careful not to use too much heat or the plastic in the socket will melt.

Step 2: Cleaning Off the Old Foam

Prism Foam
Getting access to the foam
Click on photo for a larger image
With the flash shoe bracket removed, carefully remove as much of the foam as possible using a set of tweezers to lift the foam away. Be extremely careful not to allow any of the foam to fall between the eyepiece and the pentaprism. If any foam falls in the space between the eyepiece and pentaprism, you will need to gain access the eyepiece area in order to retrieve the foam. If this happens see the section "Cleaning the Eyepiece" below. It's better to avoid cleaning the eyepiece if at all possible.
Prism Foam Removed
Foam removed from all parts
Click on photo for a larger image
Once most of the foam is removed using the tweezers, clean the flash shoe bracket, eyepiece, and pentaprism using a cotton bud (eg. Q-tip) dipped in Methyl Hydrate (Methanol). Methyl Hydrate is an excellent solvent for this type of foam and it will not attack the plastics used around the pentaprism. Methyl Hydrate can be found at your local paint supply stores and usually only costs a few dollars per litre. Again, be very careful to not drop any of the foam or Methyl Hydrate into the space between the pentaprism and eyepiece. Only a small amount of Methyl Hydrate is needed to dissolve the foam. Use lots of cotton buds.
 
The final cleaned bracket, pentaprism, and eyepiece should appear as in the photo to the left.

Step 3: Reassembly

Prism Without Foam
Final assembly without the foam
Click on photo for a larger image
Once all the parts are cleaned, re-assemble them and replace the top cover. The flash shoe bracket should be position such that when the top cover is replaced, the bracket is centred in the hole in the top cover. If the bracket isn't centred, remove the top cover and re-position the bracket.

Cleaning the Eyepiece

In the unfortunate situation where some foam or cleaning solution has fallen into the eyepiece area, the only solution is to disassemble the eyepiece area and clean it. Depending on the version of body you are working on, this could be an easy task, or it could be difficult.
 
The oldest OM-1's use a single piece frame to hold the eyepiece, meter, and circuit board. With these bodies the only way to get into the eyepiece area is to remove the pentaprism. This of course is a delicate procedure since it exposes many sensitive areas such as the galvanometer. It should not be attempted unless you feel qualified to do this type of work.
 
The newer (and luckily the majority) of OM-1's and all OM-2's use a two piece frame in which the eyepiece can be removed without any other disassembly. Cleaning the eyepiece on these models is very easy, although care still needs to be taken to not damage the wires which surround the eyepiece.

Single Piece Frame OM-1's

Removed Prism
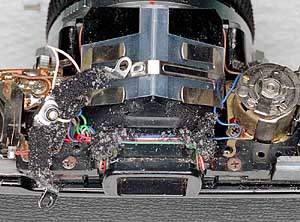
Body with pentaprism removed
Click on photo for a larger image
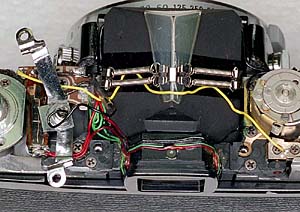
On this type of body the pentaprism must be completely removed to gain access to the back of the eyepiece. The pentaprism is held into the body by a spring mechanism 
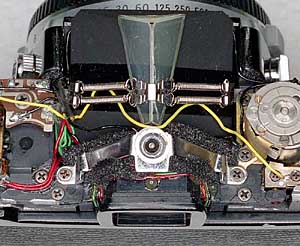
which straddles the top of the pentaprism. At the end of each side of the spring mechanism is a single screw which anchors it to the body. Once the spring mechanism is removed, 
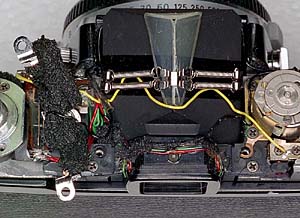
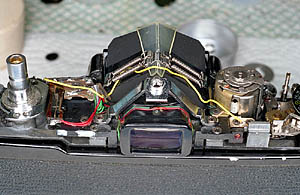
the pentaprism easily lifts out. To remove the spring mechanism, first push aside all the wiring which covers the two anchor screws. You may find it easier to unscrew the circuit board from the frame and push it aside along with all the wires. Carefully unscrew one anchor screw while firmly holding on to the spring mechanism. As the screw begins to exit the body, be sure to keep enough downward pressure on it so that it doesn't become airborne. Once the tension from the spring mechanism has been released the other side can easily be removed. With the spring mechanism out of the way, the pentaprism can be lifted out. Be very careful not to disturb the galvanometer. The photo at the left shows an OM-1 with the pentaprism removed.
 
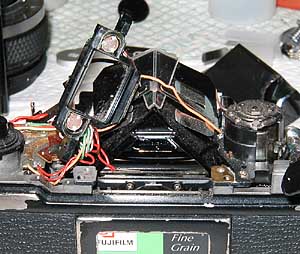
With the pentaprism removed, carefully clean the back of the eyepiece with some lens cleaning tissue lightly soaked in Isopropyl alcohol or lens cleaning fluid. Clean the pentaprism's clear surfaces using the same materials. Once the eyepiece and pentaprism are clean, carefully seat the pentaprism back into the body. When the pentaprism is seated properly in the frame it should fit snugly, there should 
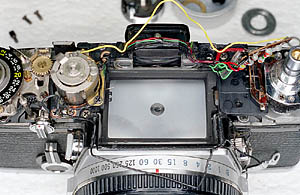
be no movement from side to side. Replacing the spring mechanism is tricky and somewhat difficult. You will need to get a very tight grip of the top of the spring and hold it firmly as the springs are stretched and anchored to the body using the screws. To stretch the spring insert the screw into the end of the spring mechanism and push down on the screw using a screwdriver. Repeat for the other side.

Two Piece Frame OM-1's and All OM-2's

New Style Eyepiece
New style eyepiece removed
Click on photo for a larger image
On newer bodies the eyepiece is in a separate frame from the rest of the upper body frame. This allows the eyepiece to be easily removed without the need to remove other components along with it. The eyepiece is removed by first removing the flash shoe bracket and then unscrewing the two screws located on either side of the eyepiece. Once the two screws are removed, the eyepiece easily lifts up and out. The photo on the left shows the eyepiece lifted away from the pentaprism. Be careful not to damage any of the wiring around the eyepiece when removing it, the wires are somewhat fragile and can be damaged if pulled too hard. With the eyepiece in this position it is easy to clean both the backside of the eyepiece and the pentaprism. Carefully clean the back of the eyepiece and pentaprism with some lens cleaning tissue lightly soaked in Isopropyl alcohol or lens cleaning fluid. Once all the surfaces are clean and dry, re-assemble the eyepiece frame.

Last update: October 2, 2003 Mark Dapoz
md@dementia.org

©copyright 2003 by Mark Dapoz. This material is provided free for personal use only. Redistribution or resale, either in part or whole, is strictly prohibited.